Microsoft introduced “Recall” in Windows 11 as part of its AI-based tools, built to help users search their screen history across apps and windows. While some find it useful, many people see it as intrusive and unnecessary—especially with privacy concerns. Recall works by taking snapshots of what you’re doing on your PC and making that searchable later.
If that sounds like a bit too much, you’re not alone. Disabling Recall is a reasonable step if you prefer keeping your activity private or want to reduce background processing. This article walks through four different ways to turn it off completely.
Disable Recall Through Settings
The most direct way to disable Recall is through the system settings panel. This method is available to anyone using Windows 11 with Copilot+ features turned on. It doesn’t require advanced tools or editing system files.
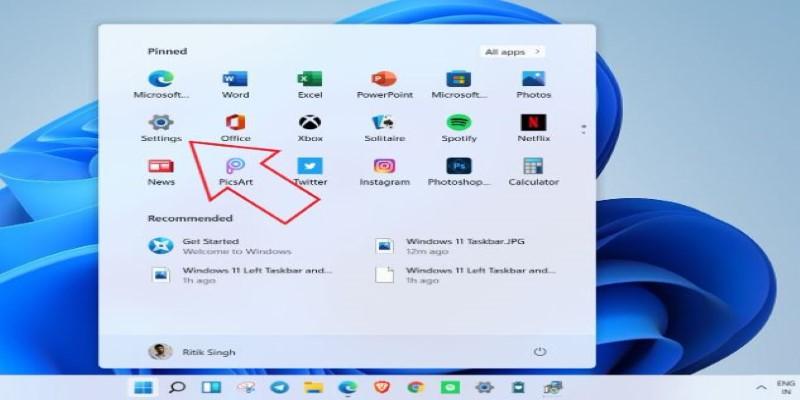
Start by opening Settings using the Start menu or pressing Windows + I. From there, navigate to Privacy & Security, and then go to Recall & Snapshots. Inside this menu, you’ll see a toggle for Recall. Turning this off will stop Windows from collecting snapshots of your activity going forward.
Once it’s disabled, the system will no longer take background screenshots. However, the snapshots that were already taken will still be stored unless you manually delete them. You can do that from the same menu. There’s an option to delete all snapshots, and it will wipe the stored history from your device. It’s a good idea to do this step if you’re serious about clearing past activity.
This approach is simple and doesn’t need administrator access, so it’s the most accessible way to shut down Recall. It’s best for everyday users who just want it turned off without touching system internals.
Use Group Policy Editor (for Pro and Enterprise Users)
If you’re using Windows 11 Pro or Enterprise, Group Policy Editor gives you more control over Recall at a system level. This method is especially useful for IT managers or users with multiple devices.
To begin, press Windows + R, type gpedit.msc, and hit Enter. Inside the Group Policy Editor, follow this path:
Computer Configuration > Administrative Templates > Windows Components > Recall.
In the right-hand panel, you'll find a policy called Turn off Recall. Double-click it, set it to Enabled, and hit OK. That's it. Once applied, Windows won't allow Recall to collect or index any screen content. You may need to restart your device for the settings to fully apply.
This method overrides any toggle in the user settings and ensures Recall is off at a deeper level. It's particularly helpful in shared environments or workplaces where policy consistency matters. If you're managing devices for a team or just want stricter control over background tracking, this approach is more reliable than using the Settings menu alone.
Disable Recall via Registry Editor (Advanced Users)
For those using Windows 11 Home edition—or for anyone comfortable working with the Registry Editor—this method gives direct access to system behavior. It’s a bit riskier than the first two, so back up your registry before you begin.
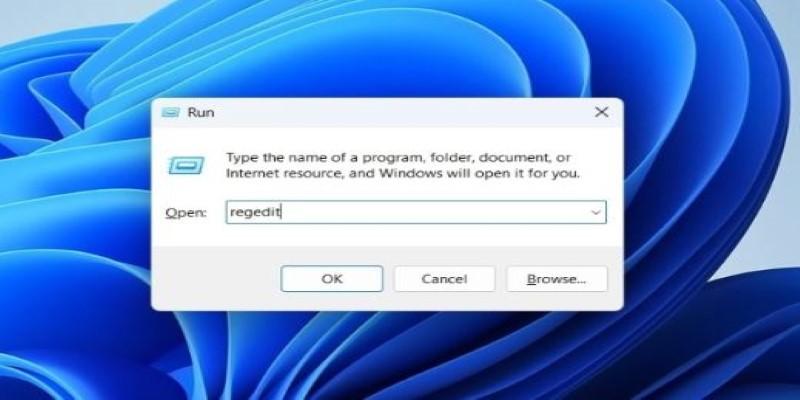
Start by opening the Run dialog with Windows + R, then type regedit and press Enter. In the Registry Editor, go to:
HKEY_LOCAL_MACHINE\SOFTWARE\Policies\Microsoft\Windows\System
If the "System" key doesn’t exist, you can right-click the "Windows" folder, select New > Key, and name it System.
Next, right-click in the right pane, choose New > DWORD (32-bit) Value, and name it DisableRecall. Once created, double-click the entry and set the value to 1.
This tells Windows to disable the Recall system-wide. Once done, close the Registry Editor and restart your PC.
This method gives you the same result as using Group Policy, but it works even on editions of Windows that don’t include the Group Policy Editor. Just be cautious—editing the registry always comes with a bit more risk. Typos or deleting the wrong keys can affect system behavior, so proceed only if you’re confident.
Prevent Recall from Running Using Task Scheduler or Background Apps Settings
Another way to cut off Recall is by stopping the process that keeps it active in the background. This method works if you want to disable Recall’s functionality without changing system policies or editing the registry.
You can check for Recall-related background services in Task Scheduler. Open it by searching for Task Scheduler in the Start menu. Once it’s open, go to the Task Scheduler Library, then look for any task related to Recall. If you find one named something like RecallSnapshotTask, right-click it and choose Disable.
If the task doesn't show up there, it might be running as a background app. To check this, go to Settings > Apps > Installed Apps, and look for any Recall-related components. Some beta builds of Windows 11 label it under experimental names. If found, open the app settings and switch off Let this app run in the background.
This approach doesn't technically "disable" the Recall system-wide, but it stops the app from running. It's good for users who don't have access to system-level tools or want a softer way to reduce Recall's activity. It's especially useful if you're testing out different system behaviors and want a reversible change without committing to registry edits or policy changes.
Conclusion
Recall in Windows 11 offers a way to revisit past activity, but it’s not for everyone. If you'd prefer not to have your screen activity tracked, you can disable it using settings, Group Policy, Registry Editor, or background app controls. Each method fits different comfort levels and system versions. Turning off Recall doesn’t affect performance or core features—it simply stops background snapshots. If you’ve used it before, don’t forget to delete any saved data. For those who prioritize privacy or want fewer background tasks, disabling Recall is a smart and straightforward step toward regaining control over your Windows experience.